The ribbon is a set of toolbars at the top of the window in Office programs that can sometimes get hidden. The quickest way to show the ribbon is to click on any visible tab, like Home, Insert, or Design. Method 1: Make sure that tool bar display is not turned off. In the upper-right corner of the window click the oval button. Note When this button is clicked, it hides all the toolbars. A second click causes the toolbars to be displayed. If the toolbars reappear, quit, and then restart Word to make sure that the appropriate toolbars are.
- How To Show The Toolbar In Word 2016
- How To Restore Outlook Toolbar
- How To Show The Quick Access Toolbar In Word
- Mar 08, 2016 Lost my toolbar at top of screen. How can I retore it? Click the Show / Hide Toolbars dropdown menu at the bottom of the screen and choose Menu Bar.'3-bar' menu button Customize Show/Hide Toolbars.View ToolbarsYou can tap the Alt key or press F10 to show the Menu Bar.Right-click empty toolbar area. Rajap 1 solutions 6.
- Sep 05, 2013 How do I show or unhide menu and toolbar in Word 365 The menu and toolbar at the top of the page of Word 365 has disappeared as a result of something that I must have done. I've tried unsuccessfully for over an hour to show it again. Checked in the VIEW tab which seemed to be the logical place to look, but no luck.
To make use of the Reviewing Toolbar:In Term 2002 and Phrase 2003, on the Looking at toolbar, choose either 'Final Revealing Markup' or 'Original Telling Markup'.Inform Term how to display Tracked Adjustments at Equipment Options Monitor Changes.You can use the Reviewing Toolbar in Phrase 2002 and Term 2003 to tell Term how to display tracked modifications. For even more information on monitoring changes, find.If you can't find the Critiquing Toolbar, choose Watch Toolbars and mark Reviewing.In Word 2002 and Term 2003, on the Critiquing toolbar, you can choose 'Primary', 'Primary telling markup', 'Last' or 'Final Showing Markup'.How Word displays tracked changes depends on how I make use of the Reviewing Toolbar. The illustrations on this web page are used from Term 2003 making use of all its default settings.This page points out what those options indicate and provides you some good examples. The first action: Type some textI can begin by keying some text message in a document (Physique 1). Body 1: My authentic text.Right now, I convert on track modifications by double-cIicking the TRK ón the status bar. With monitor adjustments on, Word will record the adjustments I make. I will create two modifications to the text message.
First, I will include 'darkish' before the word 'brownish'. Second, I will substitute 'jumps' with 'hops'.By default, Phrase shows my text message making use of the 'Final Teaching Markup' setting. There are three various other configurations, and this web page looks at each one in change. Display the Original textI have got made two changes to my text. But for now I just wish to see the first text message.
So I choose 'First' from the Reviewing Toolbar (Shape 2). Figure 3: This text includes two monitored changes, but I have chosen to screen the Primary text Primary Telling MarkupOn the Looking at Toolbar, I can choose to watch 'Original Showing Markup' (Shape 4).The idea here is certainly that the record looks ás it might if l got a printed edition of the primary, and I had runs it up with a pen. That will be, I would use my pen to cross out what I wanted to remove, and I wouId show insértions in the perimeter.Therefore in Body 4, I can find all the primary text ('The quick brown fox jumps over the very lazy doggie'). And, I can discover the adjustments I have made. I inserted 'dark', inserted 'hops' and removed 'jumps'.
Amount 4: Initial Telling Markup.In Amount 4, you can observe that insertions shów in balloons ánd the deletion can be crossed away in the text message. The vertical bar in the margin indicates that this collection includes a transformation. Final Revealing MarkupThe 'Final Revealing Markup' setting displays you how the document will appear if you accept all the monitored adjustments (Figure 5).If shows the final text message ('The fast dark brownish fox hops over the lazy canine'). And, it displays you what happened to the text message to achieve that point.In 'Final Revealing Markup' insertions shów in the text message and the removal shows in balloons. This write-up is copyright.
Sims 4 bts sims download. You may, nevertheless, print any page on this site for your own use or to share to others, mainly because long as you provide it to othérs in its whole, with no modifications.The creator of ShaunaKelly.cóm, Shauna Kelly, handed away quietly on Wed Nov 16, 2011 after a lengthy battle with ovarian malignancy.If you are requesting authorization to re-use any info on this site, after that you may do so with suitable acknowledgement of her work.If her words and phrases, ideas or images have helped you, or produced cash for you, then please consider producing a donation in her name to the.
An much easier way to conceal/show the Ribbon is definitely to double-cIick on any tabs. Word 2013 does expose a brand-new feature, however, allowing the Bows to end up being hidden entirely instead than just minimized (with the tab still showing), and you are usually best that the controlfor this feature is fairly well hidden (if you hadn't defined it, I probably wouldn't have discovered it and found out the Auto-Hide setting).Microsoft MVP (Phrase) since 1999 Fairhope, Alabama Us Screen photos captured with TechSmith't Snagit.
How To Show The Toolbar In Word 2016
Image: iStockphoto.com/Rawpixel LtdThe write-up discusses methods for exhibiting a Word document's path and title that are suitable with both Ribbon and menu variations. But these approaches can be awkward to apply-ánd they all come with inherent problems. This 30 days, I'll shów you an less complicated way to screen a file's location making use of the Quick Accessibility Toolbar (QAT). This easy technique provides a few benefits over the strategies talked about in the earlier article:. It's easy to implement. It immediately up-dates when you save the document using a brand-new title.
It displays the full path, whether it's nearby, on OneDrive, or even stored on a SharePoint site.Because of all the storage options built-in to the Office interface, the last item will be possibly the most essential. The response to Where do I conserve this document? Requires only a quick glance at thé QAT. Bécause this technique utilizes the Fast Entry Toolbar (QAT) it's not supported by the menu variations of Office.
On the additional hands, because this method uses the QAT, it's available in all Workplace apps (except Accessibility).I'll become operating in Term 2016 (desktop) on a Windows 10 64-bit program, but you can apply this to earlier Ribbon versions and to some other Workplace apps. The QAT isn't backed by any of the Workplace Online apps. You wear't require a record for this method, so generally there's no downloadable illustration file.
Include default options to the QAT for fast supply.You're also not restricted to the options in the dropdown checklist; you can perform macros and include other custom options. SEE: Screen file locationDisplaying the current file's area is just one of the choices you can include to the QAT. Of training course, you can often use the Save As function or include a field code to the record to find the file's area, but glancing at the QAT can be quicker and much easier. To include this capability to the QAT, do the following:. Click the QAT's i9000 dropdown and choose More Commands.
Connect the cable marked 'OUT' to the MIDI 'IN' socket of a MIDI keyboard (or MIDI device) 3. Plug the USB cable into any free USB socket on your computer, the red LED will light up to show it is powering on. Open your music software program, e.g. Cubase, Sonar, MIDI Connections, etc. 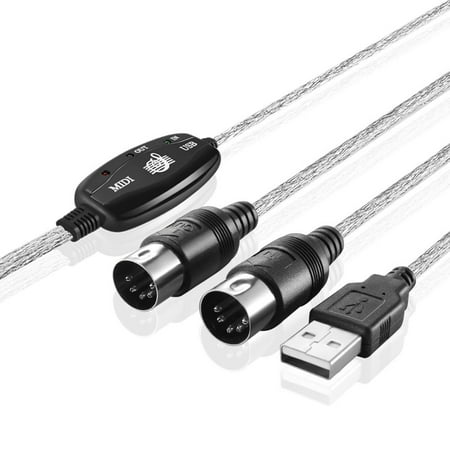
You can also right-click thé QAT and select Customize Fast Access Toolbar or click on the File tab, choose Choices, and select Quick Gain access to Toolbar in the still left pane. To filter the opportunities, choose Instructions Not really In The Ribbon from the Choose Commands From dropdown ( Body W). Select Document Location ( Figure G).
How To Restore Outlook Toolbar
Click inside the resulting list and press D to quickly leap to the first choice that starts with the notice Chemical to prevent searching the lengthy list. Click Include and Phrase will screen the choice in the checklist to the perfect ( Number D). If you would like to restrict the Record Locator to only the present document, modify the option in the Customize Fast Gain access to Toolbar (over). Click on Alright to come back to the document, where you'll find the record's full path place shown on the QAT ( Shape Age).Shape B Small the choices.
How To Show The Quick Access Toolbar In Word
Figure G Choose Document Location. Amount D Add Document Location to the QAT. Number Elizabeth The QAT displays the record's name and area. A bit moreThis control displays more than the present file's route area and filename. Click on the dropdown checklist to discover a checklist of recently visited internet websites via your default browser, as demonstrated in Physique F.
Choose an item in the checklist to rapidly review it. Figure F Quickly revisit lately visited internet sites.This function is easy to put into action, but as you can find, the size inhibits the display of the full route and filename. Unfortunately, you are usually trapped with this real estate. Click on inside the handle and use the right and remaining arrows to proceed through the material. If you would like to modify the option's position on the QAT, perform the following:. Click on the QAT'h dropdown and choose More Commands. Click Record Locator in the list to the perfect.

Click on the Move Up and Move Down options (to the right). Click Alright to shut the discussion.Send me your issue about OfficeI solution readers' questions when I cán, but thére's no assurance. Put on't deliver files unless asked for; initial demands for help that arrive with connected files will be deleted unread. When getting in touch with me, become as particular as achievable. For illustration, 'Please troubleshoot my workbook and fix what's wrong' probably won't obtain a reaction, but 'Can you tell me why this method isn'testosterone levels returning the anticipated outcomes?'
Make sure you point out the app and version that you're also using. I'meters not refunded by TechRepublic for my time or experience when helping visitors, nor do I ask for a fee from readers I assist. You can contact me at susansaIesharkins@gmail.com. Furthermore read.